(네트워크)애뮬레이션 실습8 - VLAN
[카카오 클라우드 스쿨] VLAN 구성 실습, 논리 네트워크로 구분된 DB까지 만들어 보기
네트워크 애뮬레이션 실습8 - VLAN
참고로 GNS의 명령어, 사용 방법 등은 외울 필요 전혀 없음
VLAN 개념 정리를 위한 실습
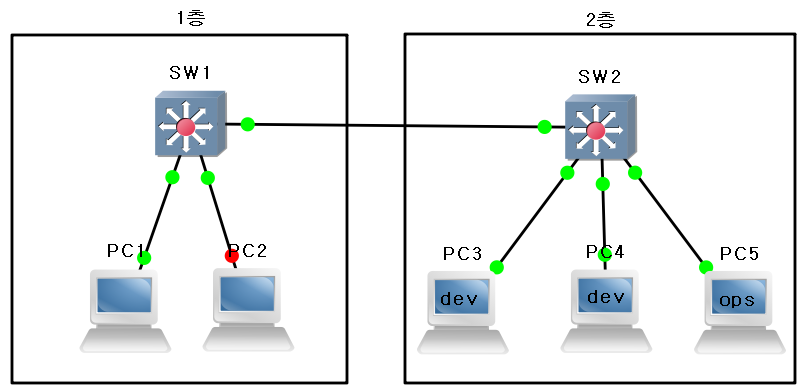
- 다음과 같이 구성한다
![img_296]()
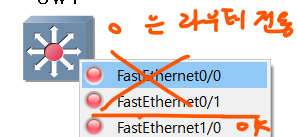
- 참고: 16개의 스위치가 있는 이더넷 스위치
- 헷갈리니까 아이콘은 Switch 모양으로 바꿀 것임

- 연결 구성
SW2#vlan dat
SW2(vlan)#vlan 10 name DEV
VLAN 10 added:
    Name: DEV
SW2(vlan)#vlan 20 name OPS
VLAN 20 added:
    Name: OPS
SW2(vlan)#exit
APPLY completed.
Exiting....
- vlan 10번과 20번 두개 생성, 이름 지정 및 적용
SW2#show vlan-sw br

VLAN Name                             Status    Ports
---- -------------------------------- --------- -------------------------------
1    default                          active    Fa1/0, Fa1/1, Fa1/2, Fa1/3
                                                Fa1/4, Fa1/5, Fa1/6, Fa1/7
                                                Fa1/8, Fa1/9, Fa1/10, Fa1/11
                                                Fa1/12, Fa1/13, Fa1/14, Fa1/15
10   DEV                              active
20   OPS                              active
1002 fddi-default                     active
1003 token-ring-default               active
1004 fddinet-default                  active
1005 trnet-default                    active
- switch의 vlan 2개가 생성된 것을 볼 수 있음
- (br: 간단히 보여줌)
SW2#conf t
Enter configuration commands, one per line.  End with CNTL/Z.
SW2(config)#int f1/1
SW2(config-if)#sw mode access
SW2(config-if)#sw access vlan 10
SW2(config-if)#int fa1/2
SW2(config-if)#sw mode access
SW2(config-if)#sw access vlan 10
SW2(config-if)#int fa1/3
SW2(config-if)#sw mode access
SW2(config-if)#sw access vlan 20
- 기본 vlan인 vlan 1번에 있던 fa1/1 및 fa1/2 fa1/3을 전부 vlan10, 20으로 이동함
- vlan 1번은 더이상 쓸 수 없게 됨
SW2(config-if)#do show vlan-sw br

VLAN Name                             Status    Ports
---- -------------------------------- --------- -------------------------------
1    default                          active    Fa1/0, Fa1/4, Fa1/5, Fa1/6
                                                Fa1/7, Fa1/8, Fa1/9, Fa1/10
                                                Fa1/11, Fa1/12, Fa1/13, Fa1/14
                                                Fa1/15
10   DEV                              active    Fa1/1, Fa1/2
20   OPS                              active    Fa1/3
1002 fddi-default                     active
1003 token-ring-default               active
1004 fddinet-default                  active
1005 trnet-default                    active
- vlan으로 이동된 것을 확인됨
- vpc들을 켠 다음에, 다음을 입력함 ```commandline PC3> ip 10.10.10.11/24 Checking for duplicate address… PC1 : 10.10.10.11 255.255.255.0
PC4> ip 10.10.10.12/24 Checking for duplicate address… PC1 : 10.10.10.12 255.255.255.0
PC5> ip 10.10.10.13/24 Checking for duplicate address… PC1 : 10.10.10.13 255.255.255.0
* switch는 IP를 구분할 수 없음
  * => VLAN으로 구분을 한다
  * 따라서 이 VPC들은 통신을 할 수가 없다

<br>

* 11, 12는 서로 통신 가능
* 11, 13은 서로 통신 불가능함
```commandline
PC3> ping 10.10.10.12
84 bytes from 10.10.10.12 icmp_seq=1 ttl=64 time=0.000 ms
84 bytes from 10.10.10.12 icmp_seq=2 ttl=64 time=0.000 ms
84 bytes from 10.10.10.12 icmp_seq=3 ttl=64 time=0.000 ms
84 bytes from 10.10.10.12 icmp_seq=4 ttl=64 time=0.000 ms
84 bytes from 10.10.10.12 icmp_seq=5 ttl=64 time=0.000 ms

PC5> ping 10.10.10.11
host (10.10.10.11) not reachable
- 통신이 안됐던 13번 IP를 가지 PC의 vlan을 이동시킴
SW2#conf t
Enter configuration commands, one per line.  End with CNTL/Z.
SW2(config)#int f1/3
SW2(config-if)#sw access vlan 10
PC3> ping 10.10.10.13
host (10.10.10.13) not reachable

PC3> ping 10.10.10.13
84 bytes from 10.10.10.13 icmp_seq=1 ttl=64 time=0.000 ms
84 bytes from 10.10.10.13 icmp_seq=2 ttl=64 time=0.000 ms
84 bytes from 10.10.10.13 icmp_seq=3 ttl=64 time=0.000 ms
84 bytes from 10.10.10.13 icmp_seq=4 ttl=64 time=0.512 ms
84 bytes from 10.10.10.13 icmp_seq=5 ttl=64 time=0.000 ms
- 이제 정상적으로 통신이 가능해 짐(같은 vlan 내부로 이사옴)
- 이제 인터페이스 설정하자
- 트렁크 포트 설정
SW2(config)#int fa1/10
SW2(config-if)#sw mode trunk
- 트렁크 포트 설정
- sw1도 똑같이 설정
SW1#vlan dat
SW1(vlan)#vlan 10 name DEV
VLAN 10 added:
    Name: DEV
SW1(vlan)#vlan 20 name OPS
VLAN 20 added:
    Name: OPS
SW1(vlan)#
SW1(vlan)#exit
APPLY completed.
Exiting....
SW1#conf t
Enter configuration commands, one per line.  End with CNTL/Z.
SW1(config)#int f1/10
SW1(config-if)#sw mode trunk
- vpc에서 테스트 ```commandline SW1(config)#int fa1/1 SW1(config-if)#sw access vlan 10
PC1> ip 10.10.10.10/24 Checking for duplicate address… PC1 : 10.10.10.10 255.255.255.0
ping 10.10.10.11 하면 잘 될 것임
<br>
<hr>
## VM ware 활용한 심화 실습
* 클론 진행
* 
* full clone으로 진행
<br>
* 네트워크 설정
* 
<br>
* 실습
* CentOS1 -> 본사에 있는 웹/DB 서버
* CentOS2 -> 지사에 있는 Desktop
<br>
* GNS에서 다음과 같이 구성
* 
<br>
* sw의 vlan 설정
```commandline
SW1#vlan database
SW1(vlan)#vlan 10 name SERVER
VLAN 10 added:
Name: SERVER
SW1(vlan)#vlan 20 name PC
VLAN 20 added:
Name: PC
SW1(vlan)#exit
APPLY completed.
Exiting....
- 기본 vlan 1에서 vlan 10, 20으로 이동
SW1#conf t
Enter configuration commands, one per line.  End with CNTL/Z.
SW1(config)#int f1/1
SW1(config-if)#sw mode access
SW1(config-if)#sw access vlan 10
SW1(config-if)#
SW1(config)#int f1/2
SW1(config-if)#sw mode access
SW1(config-if)#sw access vlan 20
- f1/10은 두개의 vlan이 모두 지나가는 곳
- 트렁크포트로 설정
SW1(config-if)#int fa1/10
SW1(config-if)#sw mode trunk
- 트렁크포트로 설정
- 여기까지의 구조
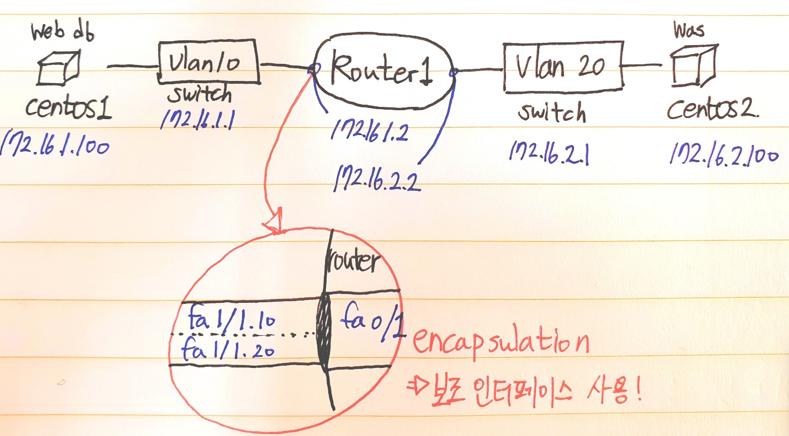
- 라우터 설정 - 인터페이스가 셧다운 되어있기 때문에 활성화
R1#conf t
Enter configuration commands, one per line.  End with CNTL/Z.
R1(config)#int f0/1
- 보조 인터페이스생성, 캡슐화 필요
R1(config-if)#int f0/1.10 R1(config-subif)#encap dot1Q 10 R1(config-subif)#ip add 172.16.1.2 255.255.255.0 R1(config-subif)#int f0/1.20 R1(config-subif)#encap dot1q 20 R1(config-subif)#ip add 172.16.2.2 255.255.255.0 - 라우트 상태: 2개가 보일 것임
- do show route ip
- 172.16.0.0/24 는 B 클래스인데, 원래 172.16.0.0/16 이 오리지널
- 즉 서브넷팅해서 두 개의 서브넷이 라우팅 테이블에 있는 것임
- 그 중 하나가 172.16.1.0/24, 172.16.2.0/24
- 즉 서브넷팅해서 두 개의 서브넷이 라우팅 테이블에 있는 것임
- Vmware의 CentOS1, 2 파워온
- CentOS2의 IP 구성을 다음과 같이 진행
- CentOS1의 IP 구성을 다음과 같이 진행


- NAT과 PAT 설정
- 내부 사용자들을 위한 dynamic PAT
- 외부 사용자들이 사내 서버로 접속할 수 있도록 Static PAT
- DB는 외부에서 연결할 수 없어야 한다
R1#conf t
R1(config)#access-list 1 permit 172.16.2.0 0.0.0.255

# 내부에서 외부로 나가는 것 설정, 내부 주소에 대한 정의 (사설주소를 누구로) - (어떤 사설주소로 바꿀건가)
R1(config)#ip nat inside so list 1 int fa0/0 overload

# 들어오는 것 설정
R1(config)#
R1(config)#int fa0/0
R1(config-if)#ip add 192.168.1.105 255.255.255.0
R1(config-if)#ip nat outside
R1(config-if)# no sh

R1(config-if)#int fa0/1.10
R1(config-subif)#ip nat inside
R1(config-subif)#int f0/1.20
R1(config-subif)#ip nat inside
R1(config-if)# no sh

# 디폴트 루트 설정 , 공유기 쪽으로
R1(config-subif)#ip route 0.0.0.0 0.0.0.0 192.168.1.1
- vm1은 8.8.8.8로 접속 불가능
- vm2는 8.8.8.8로 접속 가능
- Router의 구성
R1(config)#ip nat inside so static tcp 172.16.1.100 80 int fa0/0 80 - 정적 매핑을 하겠다
- centos1(db)에서 인터넷 접속이 가능하게 함
R1(config)#access-list 1 permit 172.16.1.0 0.0.0.255
- Centos 1에서 다음을 설치(서버)
- yum -y install mariadb-server
- Centos 2에서 다음을 설치(클라)
- yum -y install mariadb
- 데몬이 돌아가야 서비스 가능
- systemctl enable mariadb –now
- mariaDB 환경설정 세팅을 한다. 실습을 위해 다음으로 설정했다
- mysql_secure_installation
- root -> 엔터, 엔터, 새 패스워드 test123
root@localhost ~]# mysql_secure_installation

NOTE: RUNNING ALL PARTS OF THIS SCRIPT IS RECOMMENDED FOR ALL MariaDB
      SERVERS IN PRODUCTION USE!  PLEASE READ EACH STEP CAREFULLY!

In order to log into MariaDB to secure it, we'll need the current
password for the root user.  If you've just installed MariaDB, and
you haven't set the root password yet, the password will be blank,
so you should just press enter here.

Enter current password for root (enter for none):
OK, successfully used password, moving on...

Setting the root password ensures that nobody can log into the MariaDB
root user without the proper authorisation.

Set root password? [Y/n] Y
New password:
Re-enter new password:
Sorry, you can't use an empty password here.

New password:
Re-enter new password:
Password updated successfully!
Reloading privilege tables..
 ... Success!


By default, a MariaDB installation has an anonymous user, allowing anyone
to log into MariaDB without having to have a user account created for
them.  This is intended only for testing, and to make the installation
go a bit smoother.  You should remove them before moving into a
production environment.

Remove anonymous users? [Y/n] Y
 ... Success!

Normally, root should only be allowed to connect from 'localhost'.  This
ensures that someone cannot guess at the root password from the network.

Disallow root login remotely? [Y/n] Y
 ... Success!

By default, MariaDB comes with a database named 'test' that anyone can
access.  This is also intended only for testing, and should be removed
before moving into a production environment.

Remove test database and access to it? [Y/n] Y
 - Dropping test database...
 ... Success!
 - Removing privileges on test database...
 ... Success!

Reloading the privilege tables will ensure that all changes made so far
will take effect immediately.

Reload privilege tables now? [Y/n] Y
 ... Success!

Cleaning up...

All done!  If you've completed all of the above steps, your MariaDB
installation should now be secure.
- 다음으로 접속 가능
- mysql -u root -ptest123
- 데이터베이스 출력해보기
- show databases;
- 데이터베이스 하나 만들어보기
- create database testdb;
- 원격지 접속 허용하기
- mysql -u root -ptest123
- MariaDB [(none)]> GRANT ALL PRIVILEGES ON testdb.* TO ‘user1’@’localhost’ IDENTIFIED BY ‘user1’;
- MariaDB [(none)]> GRANT ALL PRIVILEGES ON testdb.* TO ‘user1’@’%’ IDENTIFIED BY ‘user1’;
- MariaDB [(none)]> FLUSH PRIVILEGES;
- 접속하기
- [root@localhost ~]# mysql testdb -u user1 -h 172.16.1.100 -p
- 외부에서 접속하기
- 지금은 외부에서 접속할 수 없음
NoSQL
- RDBMS에 비해 Shard 라는 단위로 스토리지를 관리하여 확장에 용이하다
- 저렴한 스토리지 여러개를 연결하여 대용량 저장소를 구축하고 운용하는데 어려움이 없다
- NoSQL그래프, 미디어와 같은 비정형 데이터에 대한 저장이 가능함!
- 입출력이 잦고, 위와 같은 데이터를 관리하기에 유용함
- 따라서 Front-end 측에서 많이 사용한다.
- 그러나 여전히
- 외부 사용자가 데이터베이스로 접속할 수 있도록 Router 설정
- mysql/mariadb: tcp/3306, 이 둘을 연결해주기만 하면 됨
R1(config)#ip nat inside so static tcp 172.16.1.100 3306 int fa0/0 3306
- mysql/mariadb: tcp/3306, 이 둘을 연결해주기만 하면 됨
- 내 DB에 다른 학우가 들어올 수 있으며, 마찬가지로 다른 학우의 DB에 접속이 가능함
- 외부에서 연결 성공
- 그러나 외부에서 직접 들어오는 것은 매우 위험하니, 실제로는 절대로 이런 식으로 구성하지 말것 ```shell [root@localhost ~]# mysql testdb -u user1 -h 192.168.1.101 -p Enter password: Welcome to the MariaDB monitor. Commands end with ; or \g. Your MariaDB connection id is 18 Server version: 5.5.68-MariaDB MariaDB Server
Copyright (c) 2000, 2018, Oracle, MariaDB Corporation Ab and others.
Type ‘help;’ or ‘\h’ for help. Type ‘\c’ to clear the current input statement.
MariaDB [testdb]> ```